How to Generate AI SVG Graphics Directly in Figma (2026 Guide)
For designers focused on scalable vector graphics, managing SVG assets in Figma has traditionally meant a fragmented process across multiple tools. This guide details how to generate AI SVG graphics directly in Figma using SVGMaker, an AI Figma plugin that consolidates generation, editing, and conversion into one seamless canvas workflow.
This AI Figma plugin enables you to create, edit, and convert SVG vector graphics with AI—generating from text, editing with instructions, or converting raster images—without ever leaving your design environment. As the integrated vector solution for 2026, this guide will show you how to harness its three core modes to produce and refine editable AI vector graphics efficiently within Figma.
The Fragmented Workflow: Why Standalone AI Tools Break Your Figma Process
The core issue with external AI vector generators is a technical and workflow barrier. Downloading an SVG often leads to broken paths, flattened layers, and lost editability in Figma. This forces a costly, manual process of constant context-switching between browser tabs, file explorers, and Figma for cleanup.
1. The Core Technical Incompatibility
AI vector generators and Figma speak different technical languages. When you download an SVG from an external AI platform, the code is often not optimized for Figma's engine. This leads to several common failures:
- Broken or Flattened Vectors: Complex paths, clipping masks, or effects may paste into Figma as a single, uneditable raster image or a group with corrupted layers.
- Lost Editability: The defining benefit of vectors—infinite scalability and editable anchor points—is lost. You cannot tweak the shape, adjust a curve, or change the stroke weight without starting over.
- Style Inconsistency: Colors (especially gradients), strokes, and shadows may render differently, forcing manual correction to match your Figma design system.
2. The Costly Manual Workflow
This technical gap forces a tedious, multi-tool workflow that breaks creative focus:
- Context Switching: You constantly tab between browser (AI tool), file explorer, and Figma.
- Manual Import Cycles: Each iteration requires download → save → drag into Figma → inspect for errors.
- Cleanup Overhead: You spend significant time ungrouping layers, reforming broken compounds, and fixing colors instead of designing.
Workflow Comparison: Traditional vs. Integrated
| Stage | Traditional (Fragmented) Workflow | Ideal (Plugin-Integrated) Workflow |
|---|---|---|
| Generation | On a separate website or platform. | Inside Figma, via a plugin panel. |
| Transfer | Manual download as SVG file. | Automatic, behind-the-scenes code transfer. |
| Import | Drag-and-drop or File > Import. Requires layer cleanup. | Instant appearance as an editable Figma vector object. |
| Iteration | Return to AI website, re-generate, re-download, re-import. | Edit the text prompt or settings directly in the plugin and regenerate in place. |
| Key Downside | High friction, loss of editability, and broken creative flow. | Seamless, iterative, and maintains full creative control. |
The Solution: An Integrated AI Vector Engine Inside Figma
SVGMaker – AI Vector Generator, SVG Editor & Image-to-Vector Converter is a dedicated Figma AI plugin designed to solve this fragmentation. It brings three core modes into one interface, addressing the entire lifecycle of a vector graphic.
How SVGMaker's 3 Modes Solve Core Workflow Problems
| Mode | Core Function | Key Benefit |
|---|---|---|
| Generate (Text-to-SVG) | Creates unique SVG graphics from text prompts. | Eliminates creative friction; ideation and creation happen in-context. |
| Edit (AI-Powered Editing) | Modifies existing images using natural language instructions. | Breaks the cycle of regenerating assets from scratch for minor tweaks. |
| Convert (AI Vectorization) | Transforms PNG/JPG into clean, editable SVG vectors. | Liberates logos and sketches trapped in pixel-based formats. |
The Key Differentiator: True Vector Fidelity
Unlike tools that output raster images, SVGMaker's AI returns genuine SVG markup (paths, shapes, fills). For a deep dive into the technical standard, you can refer to the MDN Web Docs guide on SVG. This results in a native Figma vector node you can ungroup, recolor using local styles, and edit at the anchor-point level—preserving infinite scalability.
Additional user-friendly features include:
- Auto-Placement on Import: Use Figma's import tools or compatible plugins to center the SVG at your current viewport.
- Immediate Visibility: Figma auto-selects and zooms to imported vectors for quick review.
- Credit Tracking: Displays remaining credits after each operation (free tier available; paid plans for unlimited use).
- Input Detection: Edit and Convert modes accept uploaded files or selections exported from Figma.
- Easy Authentication: Browser-based login with no manual token management.
Getting Started: Install & Set Up SVGMaker in Figma
Setting up SVGMaker is quick and straightforward, taking about two minutes. Follow these steps to install the plugin, launch it, and complete the one-time authentication for seamless AI-powered SVG generation, editing, and conversion directly in your Figma workspace.
Step 1: Install the Plugin
- Open Figma in your browser.
- In the main menu, click "Community" and select "Plugins".
- Search for "SVGMaker" and click "Install" or use the direct Figma Community link.
- For a complete overview of using plugins in Figma, you can consult the Official Figma plugin documentation.
Step 2: Launch and Authenticate the Plugin
- Right-click on canvas → Plugins → SVGMaker
- Click "Sign In to Continue" — your browser opens to the login page
- Log in or create a new account (email or Google). New accounts get 6 free credits plus 3 daily free credits, no credit card required
- The plugin automatically detects your successful login—no manual token or API key copying is needed. This is a one-time setup.
Step 3: Begin Creating
Upon successful sign-in, the plugin interface will update, presenting the three core tabs: Generate, Edit, and Convert. You are now ready to create, edit, and convert AI-powered vectors directly within Figma.
This seamless setup gets you from installation to your first creation in just minutes. Your login credentials are securely saved, making this a one-time authentication. You'll remain signed in across all future Figma sessions. Immediately after signing in, the plugin's three core tabs—Generate, Edit, and Convert—become active and ready to use directly on your canvas.
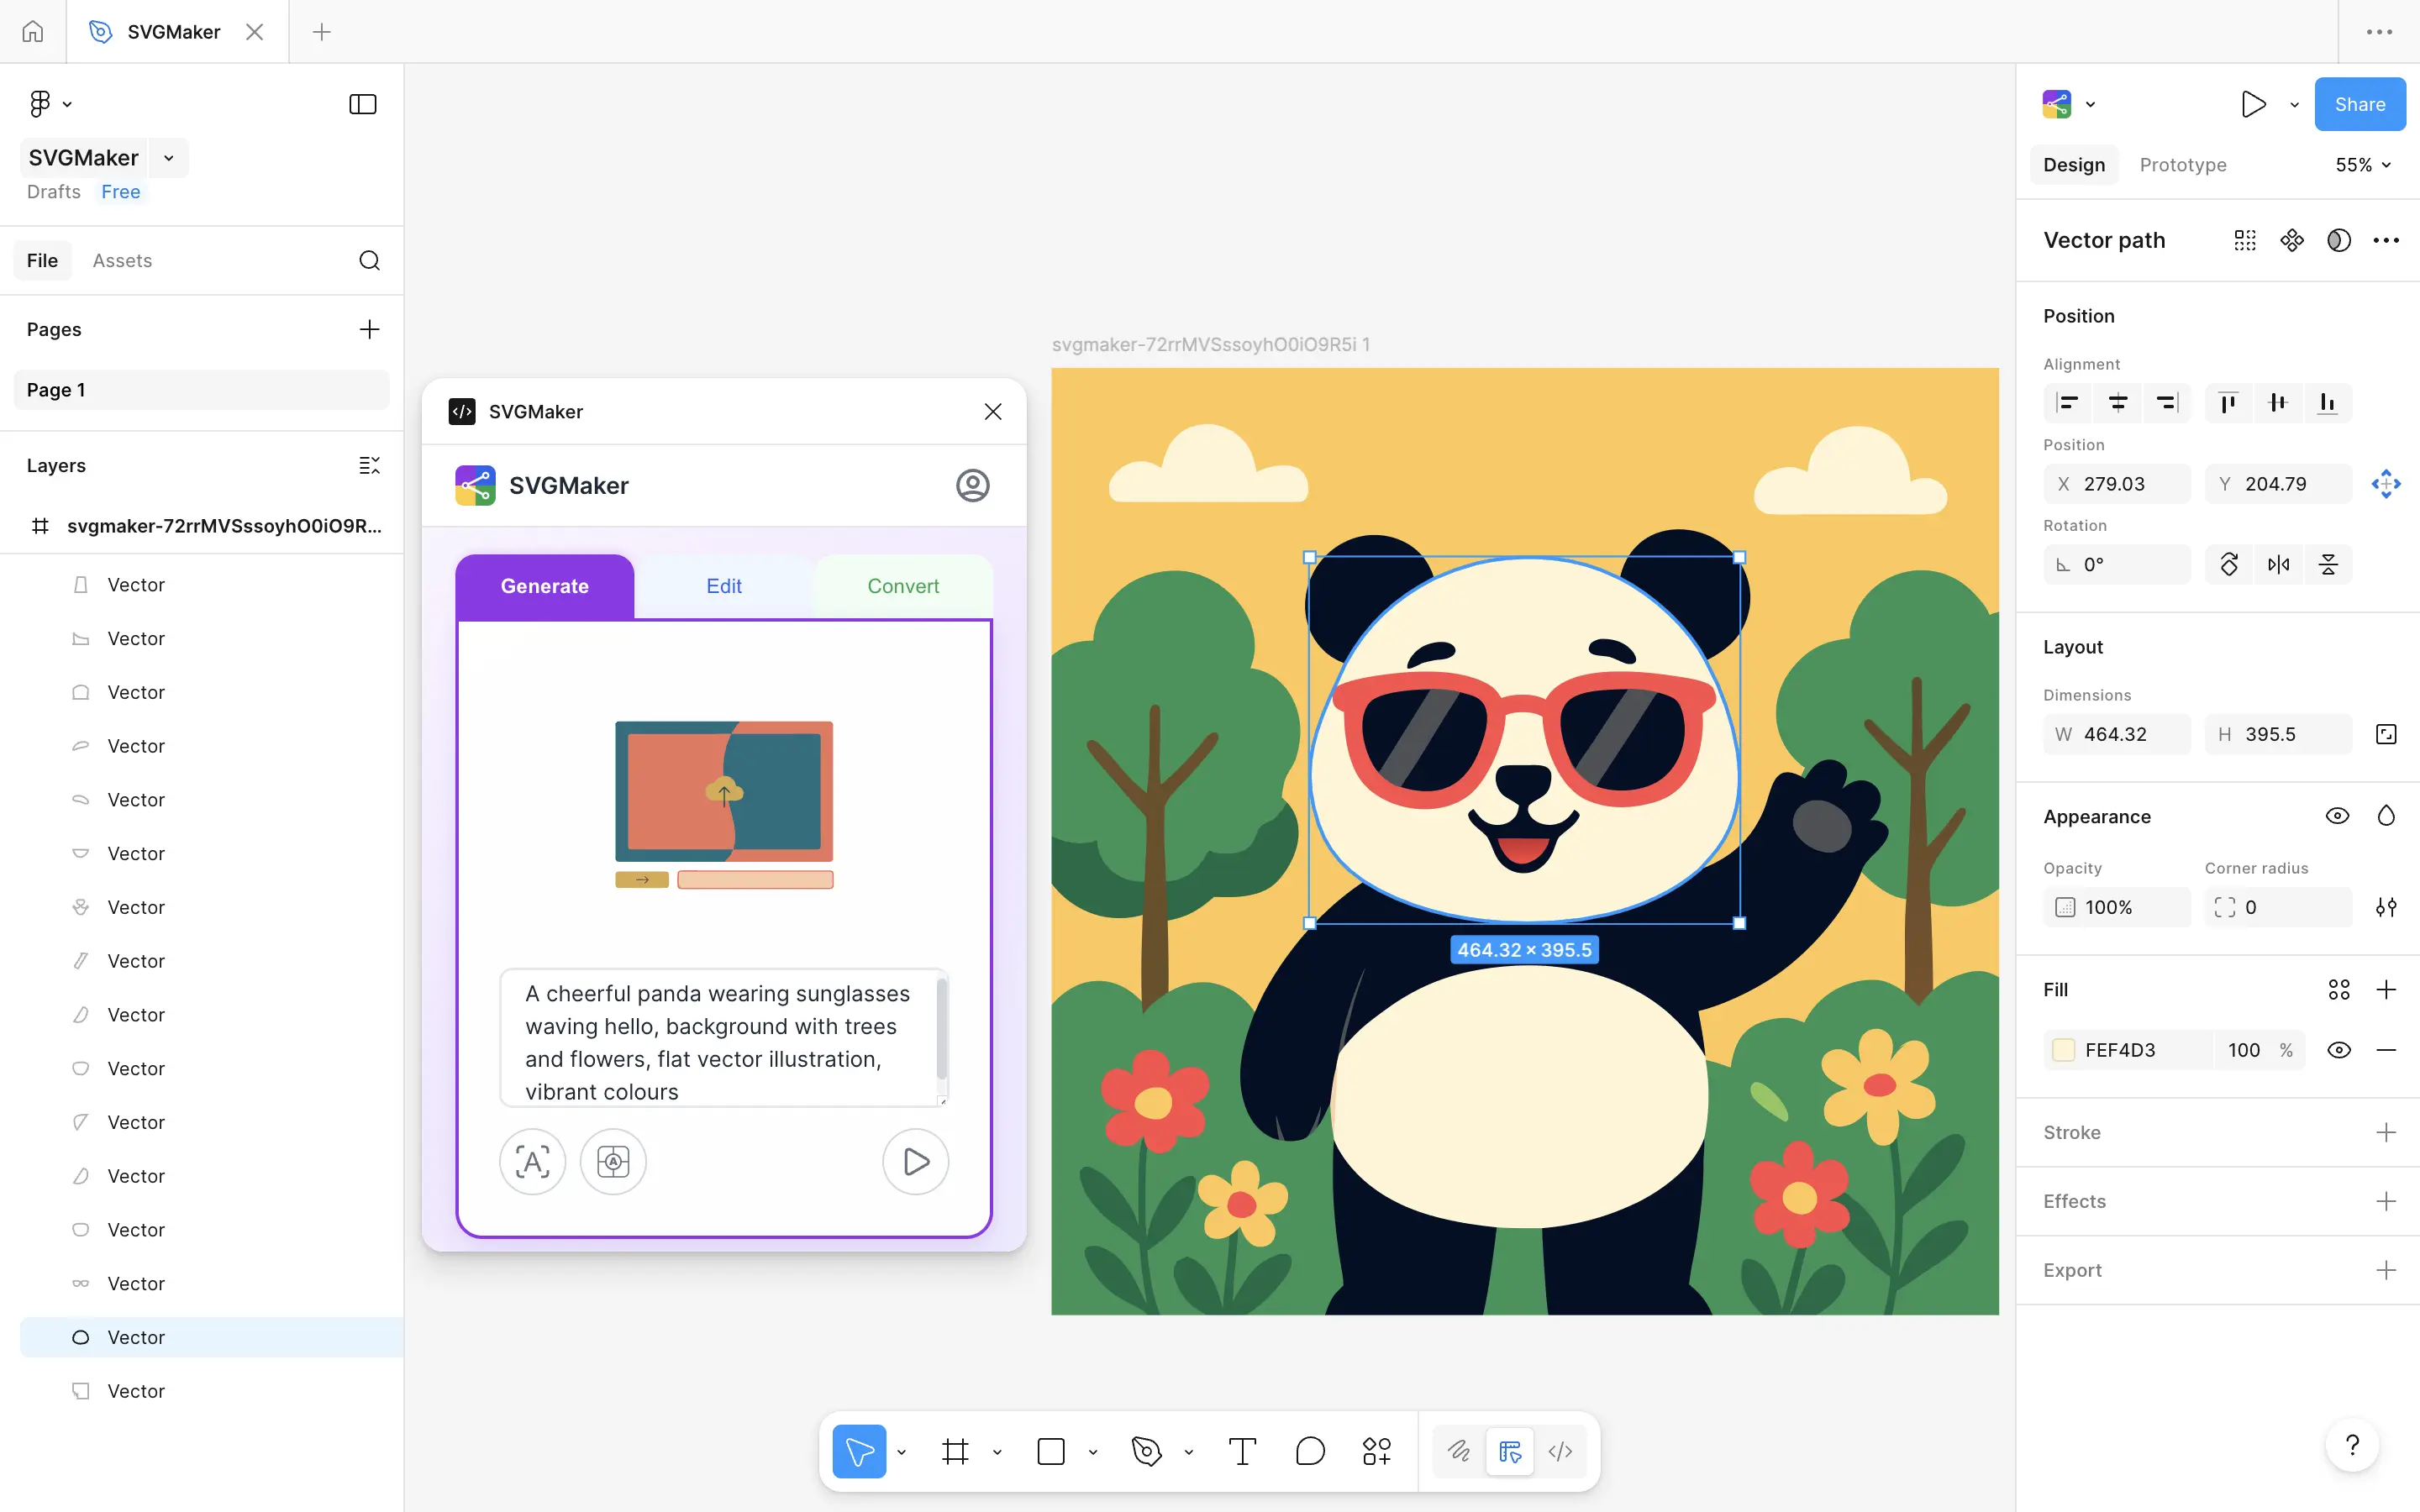
Workflow 1 — Generate Editable SVGs from Text Prompts
The Generate tab is your direct portal to AI-powered vector generation. This text-to-SVG feature translates your descriptions into clean, editable vector graphics, placing them directly onto your Figma canvas as native objects in one seamless action.
How to Generate Your First AI SVG
Follow this simple, guided process within the plugin panel:
1. Describe Your Vision
In the text input field, type a clear description of the graphic you want. For optimal results, be specific about:
- Style: (e.g., flat, line art, hand-drawn, geometric)
- Subject & Composition: (e.g., a coffee cup with steam, an abstract pattern of circles)
- Color Palette: (e.g., pastel tones, minimal colors, black and white)
2. Configure Your Output
Fine-tune the result using two key settings before generation:
- Aspect Ratio: Choose from Auto, Portrait, Landscape, or Square.
- Background: Select Auto, Transparent, or an Opaque fill color.
3. Create & Iterate
Click the "Generate SVG" button. The AI processes your prompt, and the resulting vector graphic is instantly placed on your canvas, auto-centered in your viewport, and auto-selected for immediate use.
Crafting Effective Prompts: Examples
The key to great results is a clear, concise prompt. Here are examples that leverage style and detail effectively:
"Flat-style coffee cup icon with steam, minimal colors"
"Abstract geometric pattern with overlapping circles in pastel tones"
"Hand-drawn style bicycle illustration, line art, black and white"
"Minimalist geometric logo mark featuring an abstract bird made of triangles"
After Generation: Full Editability
The generated graphic is not a static image. It is a fully editable Figma vector group. Simply double-click to enter the group and:
- Modify individual paths and anchor points.
- Change fill and stroke colors using your design system.
- Rearrange, add, or delete elements.
Note: Each generation uses 2 credits. For the cleanest, most editable SVG results, prompts describing clean shapes, flat design styles, and limited color palettes tend to work best with the vector AI model. For more tips, see our guide on generating SVGs from text prompts.
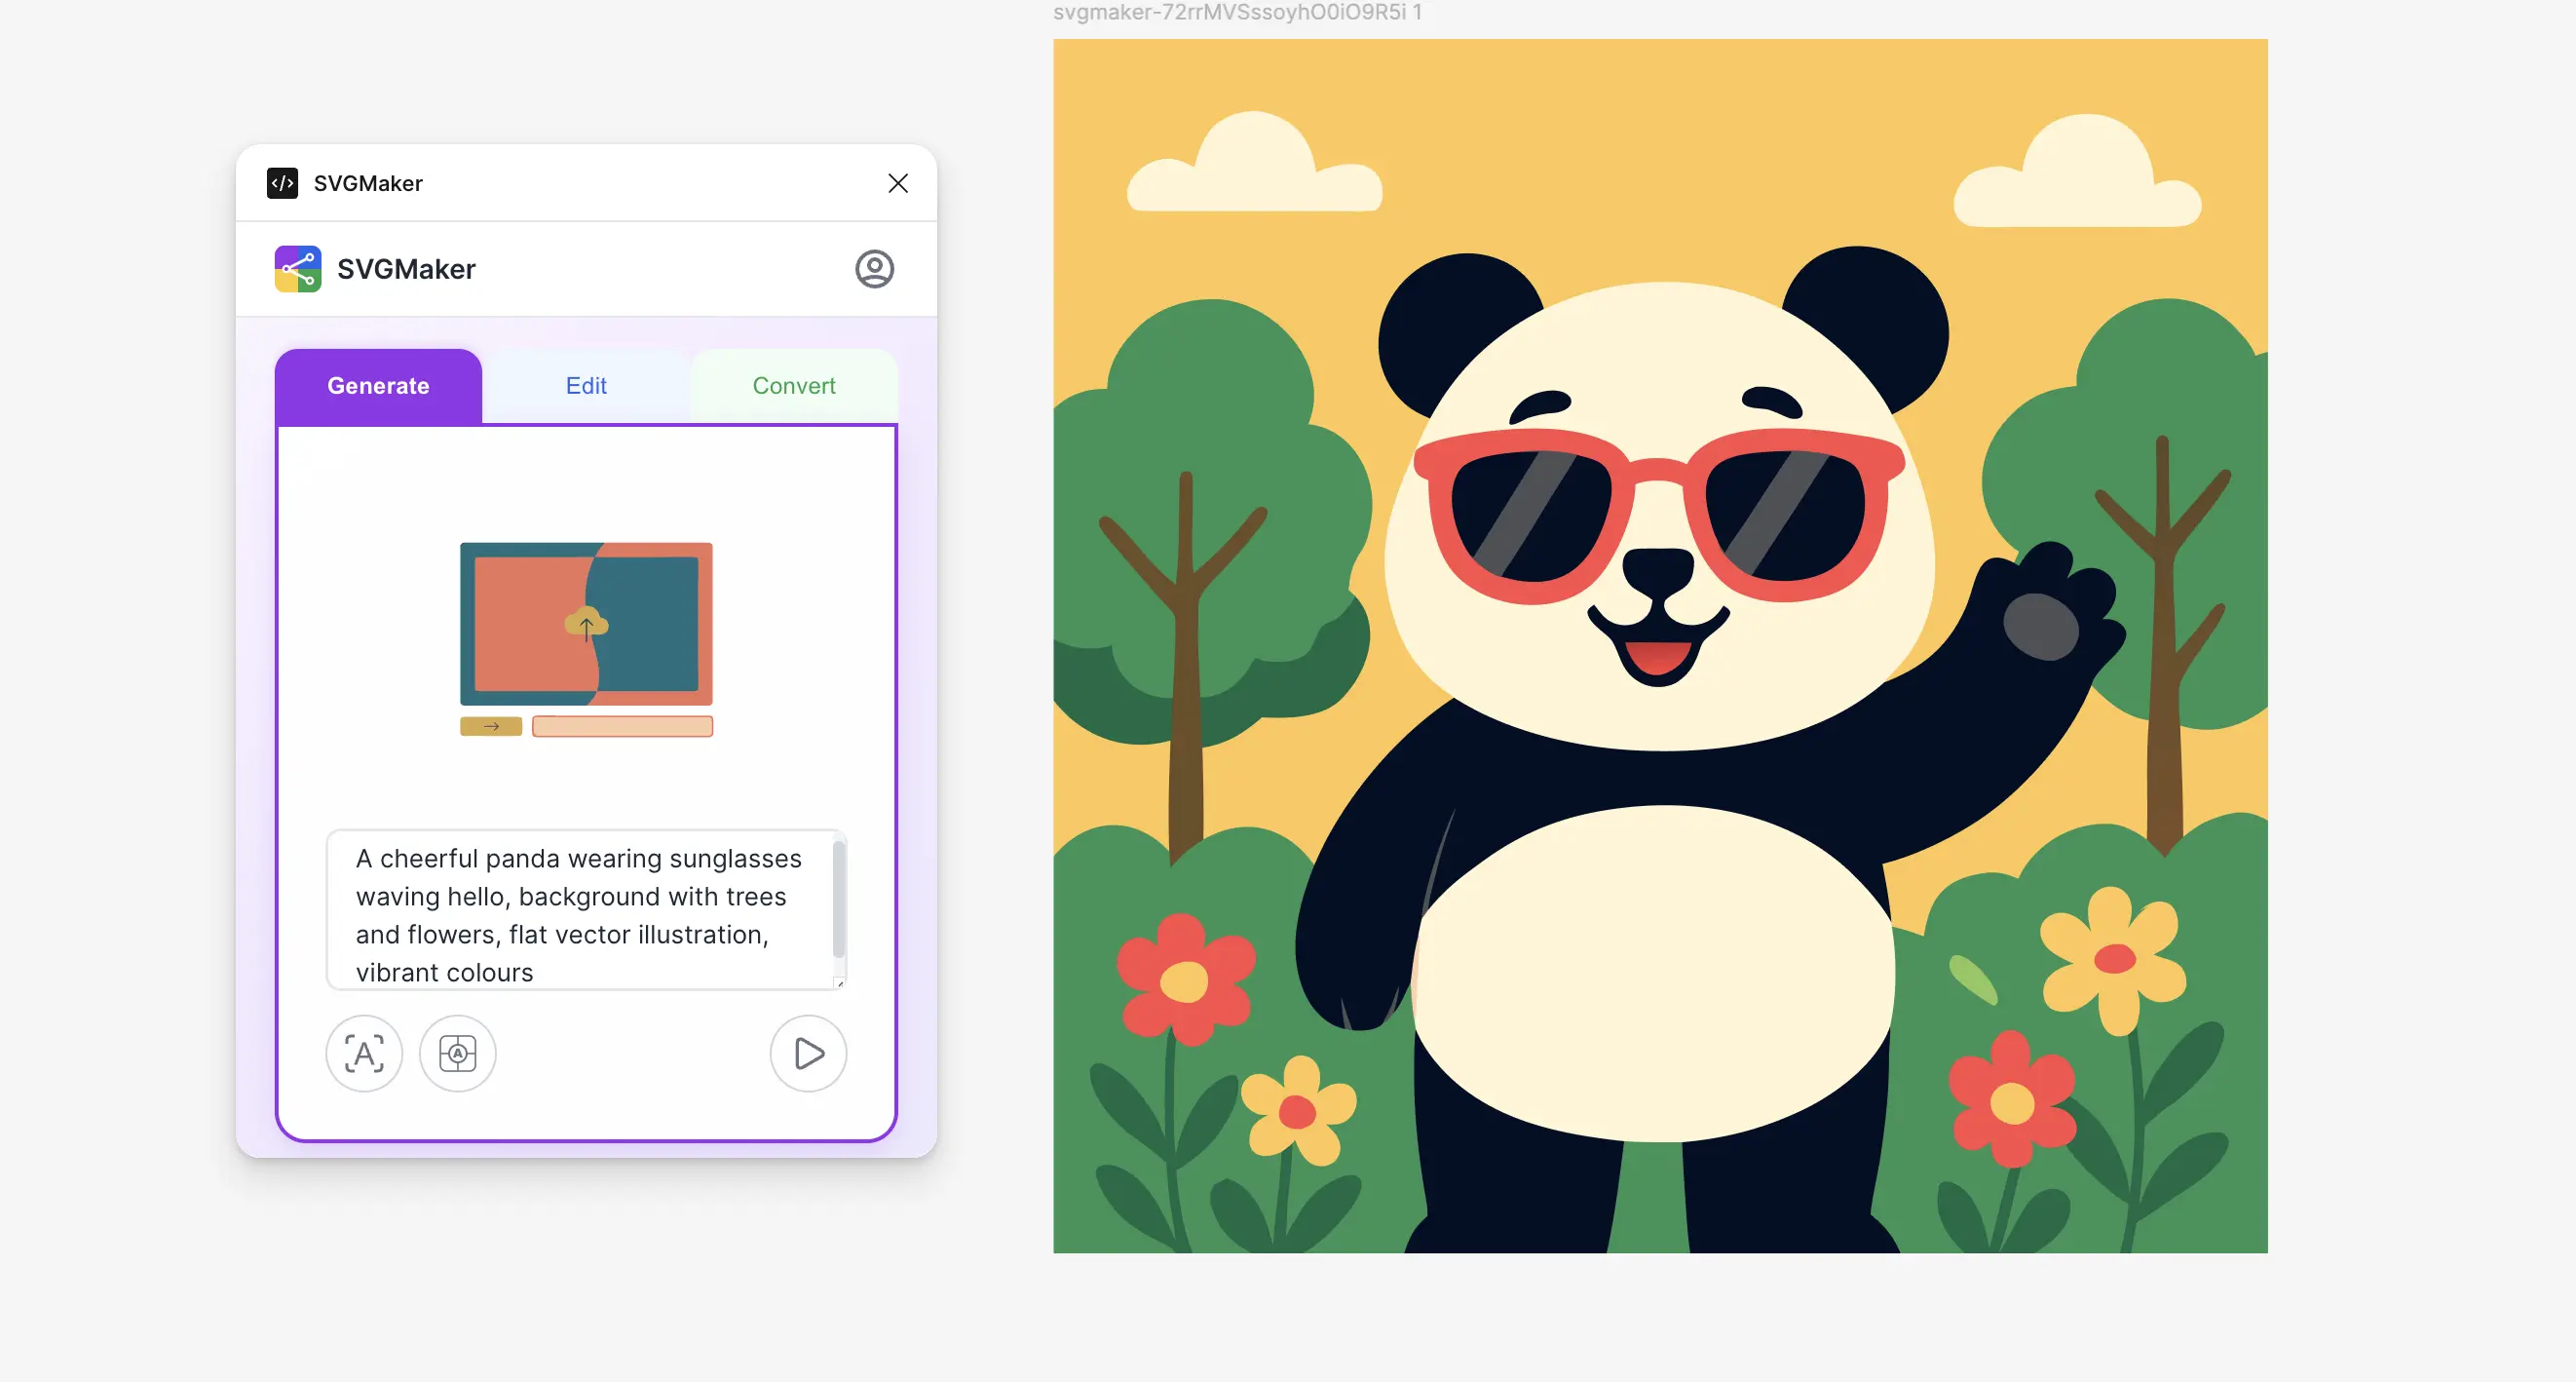
Workflow 2 — Intelligently Edit Images with AI Instructions
The Edit tab enables AI SVG editing. This feature allows you to modify any selected image or vector using text prompts, bringing powerful AI SVG editing directly into your Figma workflow—a capability that sets it apart from basic text-to-SVG tools.
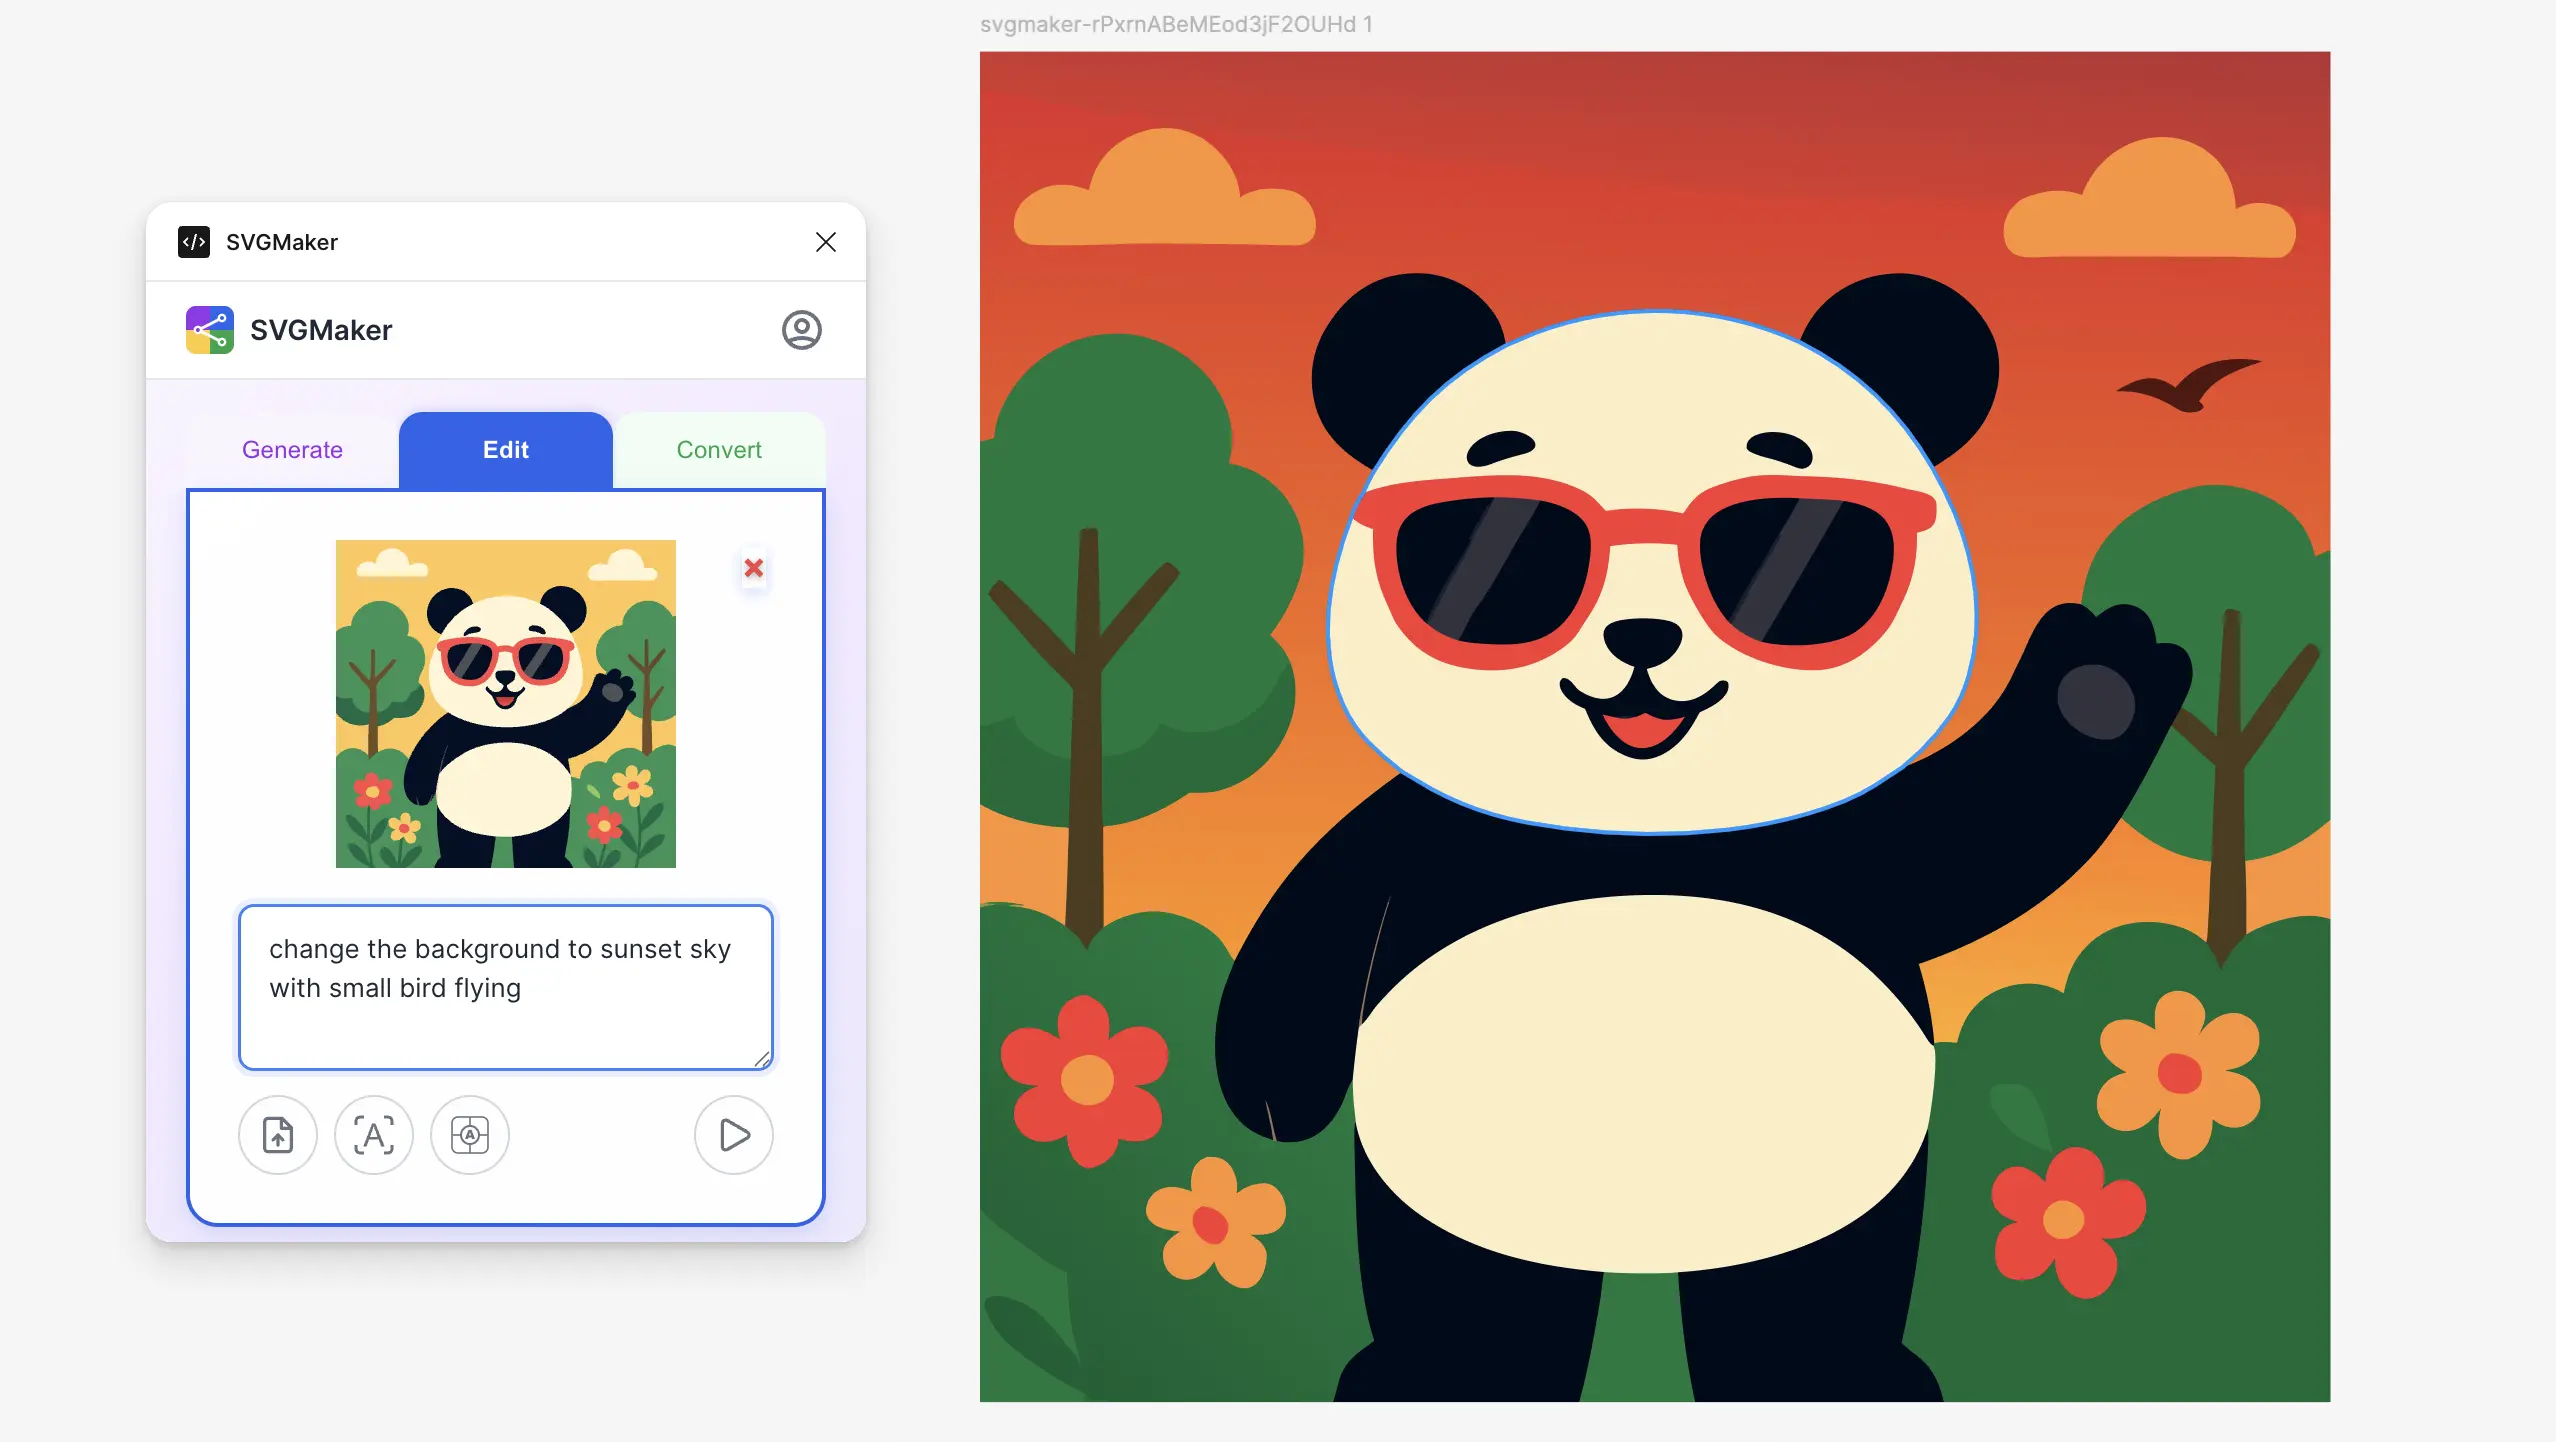
The Process: Select, Instruct, Transform
Editing is a straightforward three-step operation that requires no manual exporting or re-importing.
1. Provide Your Input Image
You have two intuitive options:
- Option A (Canvas Selection): Simply select any frame, group, or vector object on your Figma canvas. When you switch to the Edit tab, the plugin automatically detects and uses your selection.
- Option B (Direct Upload): Click to upload an image file (PNG, JPG, SVG) directly from your computer.
2. Describe the Change
In the instruction field, clearly state what you want to modify. Effective instructions are action-oriented and specific:
- "Change the color scheme to muted earth tones."
- "Remove the background and simplify the shapes into a clean icon."
- "Add a subtle sunburst pattern in the background."
- "Convert this detailed logo into a minimal line-art version."
3. Configure and Execute
Adjust the Aspect Ratio and Background settings if needed, then click "Edit Image". The AI processes your instruction and places the newly edited, fully vector SVG result onto your canvas as a new, editable element.
Key Features and Practical Applications
This workflow excels through its deep integration and practical versatility:
- Selection-Aware Intelligence: The plugin's ability to auto-capture your canvas selection eliminates tedious steps. The workflow is truly: Select → Describe → Click → Done.
- Powerful Use Cases:
- Rapid Restyling: Instantly re-color an entire icon set to match a new brand palette.
- Background Removal & Vectorization: Upload a product photo, instruct to "remove background and vectorize," and receive a clean, editable SVG cutout.
- Iterative Design: Add or remove elements from an existing illustration based on feedback.
- Sketch Refinement: Transform a hand-drawn sketch into a polished, scalable vector graphic.
Note: Each edit operation costs 3 credits. The best results come from applying edits to clear source images with concise, unambiguous instructions. Learn more in our guide on how to edit SVG files online.
Workflow 3 — Convert Raster Images to Editable AI Vectors
The Convert tab is an intelligent PNG-to-SVG converter. It uses AI vectorization to understand an image's content—producing clean, logical paths perfect for upscaling logos or recovering old icon assets—rather than just mechanically tracing pixels.

How to Convert: A One-Click Process
The SVG conversion is designed for maximum simplicity, requiring no detailed prompts or complex settings.
1. Provide Your Raster Image
Choose your input method:
- Option A (Canvas Selection): Select any placed raster image on your Figma canvas. The Convert tab will automatically detect it.
- Option B (Direct Upload): Click to upload a file directly from your computer.
2. Initiate AI Vectorization
Click the "Convert to SVG" button. The AI automatically analyzes the image's shapes, colors, and intent—no prompt needed.
3. Receive Your Editable Vector
A new SVG object appears on your canvas. Unlike a flattened image, this is a grouped vector object you can immediately ungroup to edit individual shapes, paths, and colors.
AI Vectorization vs. Traditional Image Tracing
This is not a simple auto-trace. The technology differs fundamentally:
| Feature | Traditional Auto-Trace | SVGMaker AI Conversion |
|---|---|---|
| Method | Follows pixel edges mechanically. | Analyzes content to understand shapes and objects. |
| Output | Complex paths with excessive, messy anchor points. | Clean, logical, and optimized vector paths. |
| Best For | Simple, high-contrast shapes. | Icons, logos, sketches, and illustrations. |
| Editability | Difficult and time-consuming to modify. | Straightforward to edit and refine. |
Practical Applications
This tool solves common, time-consuming design problems:
- Logo Modernization: Vectorize a low-resolution client logo from a website footer for crisp, scalable use in brand materials.
- Asset Recovery: Convert icons from an old PNG sprite sheet into individual, editable SVG files for a new design system.
- Sketch to Vector: Turn a photographed hand-drawn wireframe or illustration into a clean digital vector for further refinement. See our tutorial on converting sketches and drawings to SVG.
- Quality Enhancement: Upgrade blurry or pixelated graphics into sharp, infinite-resolution vectors.
Note: Each conversion uses 1 credit, making it an efficient way to breathe new life into raster assets. The most successful conversions start with clear, well-defined source images. For a deeper dive, see our guide on how to convert PNG to SVG online.
Pro Tips: Optimizing Your AI-Generated SVG Results
To consistently produce high-quality, editable vector graphics, effective communication with the AI is key. The following best practices will help you craft better prompts and choose suitable subjects for the best possible SVG output. For post-generation refinement, check out our tutorials on cleaning up AI-generated SVG and SVG optimization techniques.
1. Crafting Effective Prompts: Be Specific and Directive
The clarity of your instruction directly impacts the quality of the vector. Structure your prompts using these principles:
Define the Style Explicitly: Start with clear stylistic keywords.
- Instead of: "a dog icon"
- Use: "A flat, minimalist dog icon" or "A single-line drawing of a dog"
Control the Color Palette: Limit colors for cleaner, more cohesive vectors.
- Example: "A geometric pattern using only shades of blue and white"
Use Negative Instructions: Actively exclude unwanted elements to refine the output.
- Example: "A simple logo mark, no gradients, no text, and no background."
2. Understanding Vector-First Design
The AI excels at creating graphics that are inherently vector-friendly. Guide it by thinking in terms of shapes and paths.
Prioritize Simplicity: Clean lines, defined shapes, and clear compositions yield superior SVG structures. If a concept would be complex to draw manually with a pen tool, it would challenge the AI as well.
Reference Scale and Use: Hinting at the final application can guide the AI's detail level.
- Example: "A simple, recognizable icon that reads clearly at 16x16 pixels."
3. Choosing the Right Subject Matter
Your choice of subject significantly influences success. Here's a guide to what typically works well versus what may not translate effectively into clean vectors:
| Ideal Subjects for AI SVG | Challenging Subjects to Avoid |
|---|---|
| Icons & UI Symbols (buttons, app icons) | Photorealistic Scenes (detailed portraits, landscapes) |
| Logos & Brand Marks (geometric, emblematic) | Complex Illustrations (crowded scenes with many objects) |
| Patterns & Ornaments (repeating geometric shapes) | Text-Heavy Designs (the AI generates text as non editable vector paths, not text layers) |
| Line Art & Silhouettes (single-weight strokes, filled shapes) | Highly Detailed Textures (fur, hair, intricate fabric) |
| Simple Illustrations (flat character design, infographic elements) | Images Requiring Specific Typography |
Troubleshooting & Account Management
This section provides solutions for common technical issues and explains the credit system that powers the SVGMaker plugin.
Common Issues and Solutions
If you encounter an error, this guide will help you resolve it quickly.
"Sign-in timed out."
Solution: Simply click "Sign In to Continue" in the plugin again. Ensure you fully completed the login process on the svgmaker.io page that opened in your browser.
"SVG looks unexpected or messy."
Solution: Refine your text prompt. Use more specific style descriptors like "vector style," "clean lines," "flat design," or "minimalist" to guide the AI toward a clearer graphic. You can also edit SVG files online for further refinement.
"Please select an image or upload one."
Solution: This appears in the Edit and Convert tabs. You must either select an image layer on your Figma canvas or use the upload button to provide an input file.
"Operations fail after signing in."
Solution: Your session token may have expired. Log out from within the plugin panel and sign in again to refresh your connection.
"SVG is not editable — it looks like a single object."
Solution: Generated SVGs are placed inside a frame or group. Double-click on the object to enter the group. You may need to double-click again to access the individual vector paths, which are fully editable.
"Low on credits."
Solution: Check your current credit balance and manage your subscription by visiting your account dashboard at svgmaker.io.
Credit System and Pricing
SVGMaker operates on a straightforward credit-based system. Your account and credits are shared between the SVGMaker platform and the Figma plugin.
| Operation | Credit Cost |
|---|---|
| Generate (Text-to-SVG) | 2 credits |
| Edit (AI Image Editing) | 3 credits |
| Convert (Raster-to-Vector) | 1 credit |
For detailed information on credit packs, subscription plans, and pricing, please visit the official website: svgmaker.io.
Frequently Asked Questions (FAQ)
1. Is the Figma plugin free to install?
Yes. The SVGMaker plugin is completely free to install from the Figma Community. To use its AI features—Generate, Edit, and Convert—you need a SVGMaker account, and operations consume credits from your account balance.
2. Do I need to create a separate account for the plugin?
No. You use your existing svgmaker.io account. A one-time, browser-based sign-in from within the plugin links your account securely; no manual API key entry is required.
3. Can I edit the AI-generated SVG after placing it in Figma?
Absolutely. Unlike raster images, every output is a native Figma vector node. You can ungroup, double-click to edit individual paths, and modify all fills, strokes, and shapes without limitation. You can also use SVGMaker's online SVG editor for additional editing.
4. Can I use the generated SVGs in commercial projects?
Yes. You retain full rights to all SVG graphics you create with SVGMaker. They are yours to use in personal, client, and commercial projects without attribution.
5. Does the plugin work with Figma's free Starter plan?
Yes. The SVGMaker plugin is fully compatible with all Figma plan tiers, including the free Figma Starter plan.
6. What makes SVGMaker different from other AI design plugins?
SVGMaker is the only Figma AI plugin that combines three core workflows in one tool: Generate (text-to-SVG), Edit (AI image editing), and Convert (AI vectorization). All outputs are true, editable SVG vectors, not raster images.
7. Why isn't my canvas selection detected in the Edit or Convert tab?
Ensure you have a specific layer (like an image, frame, or group) selected. The plugin reads your active Figma selection when you switch tabs. An empty canvas or a selection that isn't a visible element won't be detected.
Conclusion: The Integrated AI Vector Workflow for 2026
SVGMaker closes the loop between AI vector generation and professional vector design. By integrating a text-to-SVG generator, an AI SVG image editor, and an intelligent PNG to SVG converter into one Figma AI plugin, it replaces a fragmented multi-tool process with a single, seamless Figma workflow.
You can now generate AI vector graphics from a text prompt, edit existing SVG images with text instructions, and convert raster images to SVG without leaving your canvas. Every output is delivered in seconds as a true, editable SVG with native Figma paths and strokes—not a flattened image—ensuring infinite scalability and complete creative control.
For designers seeking the most efficient AI SVG generator for Figma, this three-in-one plugin is the definitive 2026 solution. Transform your process in under two minutes: install the plugin, sign in once, and start creating editable vector graphics directly on your canvas. Explore the SVGMaker gallery for inspiration on what you can create.